参考: Convolutional Neural Networks https://github.com/tensorflow/models/tree/master/tutorials/image/cifar10/
上記githubに実際のコードがあります。 Cifar10というのは、10種類のカラー画像が沢山入ってるやつで、機械学習によく使われるようです。場所は下記です。 http://www.cs.toronto.edu/~kriz/cifar.html Cifar100というのもあるようです。
データは、pythonバージョンとかバイナリバージョンとかありますが、TensorFlowが使ってるのは、バイナリバージョンです。バイナリバージョンの説明として、上記本家サイトに下記のように書いてあります。
The binary version contains the files data_batch_1.bin, data_batch_2.bin, ..., data_batch_5.bin, as well as test_batch.bin. Each of these files is formatted as follows: <1 x label><3072 x pixel> ... <1 x label><3072 x pixel> In other words, the first byte is the label of the first image, which is a number in the range 0-9. The next 3072 bytes are the values of the pixels of the image. The first 1024 bytes are the red channel values, the next 1024 the green, and the final 1024 the blue. The values are stored in row-major order, so the first 32 bytes are the red channel values of the first row of the image. Each file contains 10000 such 3073-byte "rows" of images, although there is nothing delimiting the rows. Therefore each file should be exactly 30730000 bytes long. There is another file, called batches.meta.txt. This is an ASCII file that maps numeric labels in the range 0-9 to meaningful class names. It is merely a list of the 10 class names, one per row. The class name on row i corresponds to numeric label i.
ダウンロード&展開
ここにダウンロードのコードをいくつか書きました。ここではTensorFlowのコードサンプルと同じくurllib.request.urlretrieveを使います。
import os
import sys
import urllib.request
import tarfile

url = 'http://www.cs.toronto.edu/~kriz/cifar-10-binary.tar.gz'
dirpath = './hoge'
filename = url.split('/')[-1]
filepath = os.path.join(dirpath, filename)
def _progress(cnt, chunk, total):
  now = cnt * chunk
  if(now > total): now = total
  sys.stdout.write('\rdownloading {} {} / {} ({:.1%})'.format(filename, now, total, now/total))
  sys.stdout.flush()
urllib.request.urlretrieve(url, filepath, _progress)
tarfile.open(filepath, 'r:gz').extractall(dirpath)
展開された内容
$ ls -go
-rw-r--r-- 1       61 6月   5  2009 batches.meta.txt
-rw-r--r-- 1 30730000 6月   5  2009 data_batch_1.bin
-rw-r--r-- 1 30730000 6月   5  2009 data_batch_2.bin
-rw-r--r-- 1 30730000 6月   5  2009 data_batch_3.bin
-rw-r--r-- 1 30730000 6月   5  2009 data_batch_4.bin
-rw-r--r-- 1 30730000 6月   5  2009 data_batch_5.bin
-rw-r--r-- 1       88 6月   5  2009 readme.html
-rw-r--r-- 1 30730000 6月   5  2009 test_batch.bin
最初の1バッチがラベル、その次からは赤、緑、青の順で1024バイトずつ入ってる。画像の大きさは32 x 32(=1024)。画像は各ファイルに1万枚分ある。 (1024 x 3 + 1) x 10000 = 30,730,000(bytes)
試しに画像を表示させてみる
試しにdata_batch_1.binから1枚分取得して表示させてみます。下記のreshapeとかtransposeで頭がこんがらがったのでここテストして頭を整理しました。
import numpy as np
from PIL import Image

path = './hoge/cifar-10-batches-bin/data_batch_1.bin'
data_size = 32 * 32 * 3 + 1
with open(path, 'rb') as f:
    data = np.frombuffer(f.read(), np.uint8, count=data_size)
label = data[0]
img_arr = data[1:]
img = img_arr.reshape(3, 32, 32).transpose(1, 2, 0)
Image.fromarray(img).show()
![]()
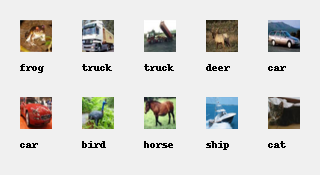
10枚取得してラベルもあわせて表示してみる
コードサンプル
import numpy as np
from PIL import Image, ImageDraw

path = './hoge/cifar-10-batches-bin/data_batch_1.bin'
names = ['airplane', 'car', 'bird', 'cat', 'deer', 'dog', 'frog', 'horse', 'ship', 'truck']
label_size = 1
img_size = 32 * 32 * 3
data_size = label_size + img_size
data_num = 10

with open(path, 'rb') as f:
    data = np.frombuffer(f.read(), np.uint8, count=data_size*data_num)
label = np.zeros(data_num)
img_arr = np.zeros([data_num, img_size])
for i in range(data_num):
    start = i * data_size
    label[i] = data[start]
    img_arr[i] = data[start + 1 : start + data_size]
img = img_arr.reshape(data_num, 3, 32, 32).transpose(0, 2, 3, 1)

canvas = Image.new('RGB', (320, 175), (240, 240, 240))
draw = ImageDraw.Draw(canvas)
for i in range(data_num):
    num = i if i < 5 else i - 5
    x = 20 + (32 + 30) * num
    y = 20 if i < 5 else 20 + 32 + 45
    canvas.paste(Image.fromarray(np.uint8(img[i])), (x, y))
    draw.text((x, y + 32 + 10), names[int(label[i])], fill='#000000')
canvas.show()
結果